|
Tutorial 17
You can use this arrow as a bookmark.
Drag it where ever you want to..

Download the zip with the picture en de base here
You also need the plug-in
Snowflakes from VDL Adrenaline
Don't forget to re-start your PSP program after you add a new
filter.
This tutorial has 2 parts.
First we going to learn making a globe
In the second part we learn how to use it.
Step 1
Open a new image 300x300 pixels, transparent.
Go to the selection tool and select a circle anti-alias
Start in the middle of your image.
With your right mouse button you can move it.
Effects - 3D effects - Buttonize (86-86-30-transparent)
Effects - 3D effects - Cutout (35-35-40-100) Shadow color = black
(don't fill interior)
Layers - new raster layer
Effects - 3D effects - Cutout (minus 35- minus 35- 25-50)
Layers - new rasterlayer
Select your paint brush (setting +Round 10)
Make white your foreground color
Make 2 curved lines , 1 above and 1 under.
This one is blue and just an example for the lines:
Adjust - Blur - Gaussian Blur 4
Layers - Merge - Merge visable
Copy the globe, click somewhere in the grey work area with right and
choose paste as new image
Now you don't have superfluous space around the globe.
You may close the old one.
Save your globe as PSP image, so you can use it again some other
time.
Now we have used a circle, but you can also make this in an other
shape.
For this tutorial we will use this one.
Step 2
Open the supplied picture.
Click with right in the layer palette and choose Promote background
layer.
Copy your globe and paste it as new layer in the picture.
Drag it over the part of the picture that you want in your globe.
Select the lowest layer (raster 1) in your layer palette.
Go to the selection tool and select the circle again.
Draw a selection from the middle of your globe and make it the same
size as the globe.
You can move it a little bit with the right mouse button if needed.
Selections - Invert.
Now hit the delete button on your keyboard.
There will just be a circle left of your picture.
Make the opacity of raster 1: 90%
in your layerpalette.
Layers - Merge - Merge visable
Step 3
Open Globebase-electra. psp
Copy and paste as new layer in the image with the globe.
You can drag the globe a little bit higher, so the base fits under
the globe.
With the Raster Deform Tool you can deform the base.
If you hold the CTRL button, you can deform each corner separately.
Maybe you even must erase a little bit of the base. I don't know the
exact size of your globe.
When it fits, lock the layer with the globe (raster 1) in the layer
palette
Step 4
Select the lowest layer, the other one is locked.
Go to the selection tool and select the circle again.
Draw a selection from the middle of your globe and make it the same
size as the globe.
You can move it a little bit with the right mouse button if needed.
It doesn't matter when it's a little bit smaller, but it may not be
bigger then the globe!
Selections - Load/save selection - Save selection to Alpha Channel
Name the selection ---> Globe
Selections - select none
Don't move the globe anymore now!!!!
Copy the merged layer 2x and lock the copy's in the layer palette
Copy the base (raster) 2x also and lock the copy's in the layer
palette
Unlock raster 1 (the globe)
Select the lowest layer, just by clicking on it in the raster
palette.
Selections - Load/ save selection - Load selection from Alpha
Channel and choose the globe
The selection will be around the globe again.
Effects - Plugins - Snowflakes (VDL Adrenaline) with the next
settings:
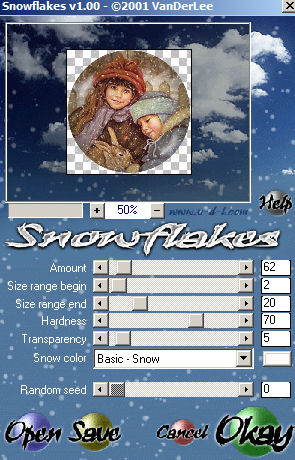
Click Okay
Selections - select none
Layers - Merge - Merge Visable
Rename this layer in the layer palette and name it Layer A.
Lock this layer.
Step 5
Now open 1 copy of the merged layer
(globe) and 1 copy of the raster layer (base)
Select the copy of the merged layer.
Selections - Load/ save
selection - Load selection from Alpha Channel and choose the globe
The selection will be around the globe again.
Effects - Plugins - Snowflakes (VDL Adrenaline) with the next
settings:
Everything the same as above, only change the random seed to 2000
Click Okay
Selections - Select none
Layers - merge - merge visible
Rename this layer in the layer palette and name it Layer B.
Lock this layer.
Now open the last copy of the merged layer (globe) and the last copy
of the raster layer (base)
Select the copy of the merged layer.
Selections - Load/ save
selection - Load selection from Alpha Channel and choose the globe
The selection will be around the globe again.
Effects - Plugins - Snowflakes (VDL Adrenaline) with the next
settings:
Everything the same as above, only change the random seed to 4000.
Click Okay
Selections - Select none
Layers - merge - merge visible
Rename this layer in the layer palette and name it Layer C.
Unlock all 3 layers now and select A.
When there's a lot of empty space around your snowball, use your
crop tool
Step 6
File - Save as - file name= tut 17 and save as type: Animation Shop
(second from above)
Open animation shop now.
File - Jasc sofware products - Launch Animation Shop.
In animation shop:
Go
to the animation wizard
 on the left. (under File)
Select:
Same size (next)
Transparent (next)
Center and canvas color (next)
Yes, repeat and 20 seconds (next)
Add image and search for tut 17
File type is Paint Shop Pro image!!
Open the image tut 17 (next)
Finish
By clicking here
 you can see your animation
File - save as- choose a name and select a folder.
Your creation is finished.
Will you tell me in my guestbook what you think of the tutorial?
|